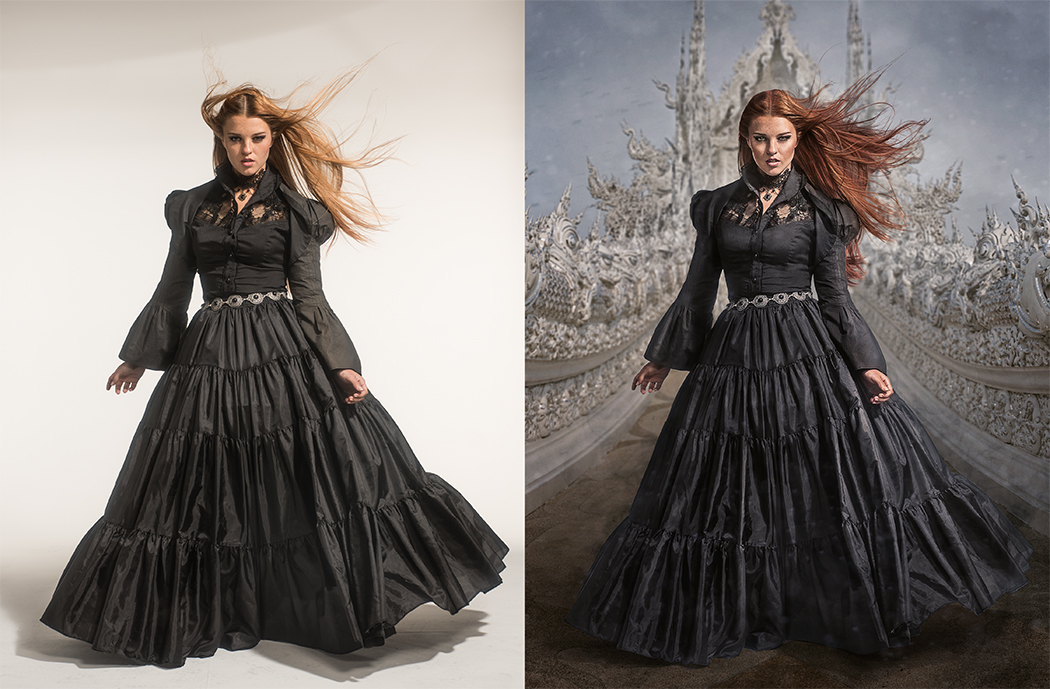
I FINALLY HAVE A TUTORIAL FOR SALE!! *heavy breathing* ... I get asked pretty regularly if I have any tutorials people can get their hands on, or even if I have a "slower version" of my speed edits. Well, that day has finally arrived!!!! *More heavy breathing ... catches breath* I'm SO proud of the almost 8 hours of videos that I recorded recently in Germany with the fantastic dudes of RAWexchange. (Yes, it is the place that sells all of the textures and packs of images that I never seem to stop talking about #sorrynotsorry). So anyway, if you've ever felt the need to watch me do three different photo shoots, pose models, alter lighting, and take an image through my entire Photoshop process while simultaneously talking your ear off the whole time about what the heck goes on in my head ... well then this tutorial is for you!
Just to wet your whistle (eww, what a weird gross saying .... ), I thought I would share one of the images created for the tutorial and chat a bit about one of my greatest compositing tips. You're welcome. But if you're all, "Thanks for the great tip about compositing Robert! ... But that's just not enough. I want to know more!" Then you can go buy my tutorial and help pay off my epic student loan debt ....
As an artist who primarily creates composite images, I find that one of my biggest challenges is hair - masking hair, to be exact. It can be nearly impossible to get all of those little individual hairs cut off their background so I can place my subject somewhere magical. NEARLY impossible ... Ok so it's actually not THAT hard, but there is one major tip that will make your life about a 1000 times easier. Shoot on the right background.
A lot of "normal" humans (aka non-photographers) tend to ask me if I shoot my images on green screen or possibly blue screen. Sillier questions have been asked, but no I do not. In the movie industry, blue and/or green are the go-to choices. As a composite artist I'm only removing the background for one frame and can spend a good amount of time refining that mask, so I tend use one of two colors for my background: black or white.
If I were to shoot on a green screen, it would certainly be pretty easy to select the greens and remove them from the image since skin and hair usually don't have a lot of green tones in them. I might even be able to get a fairly sharp edge around the body, but when it comes to the hair, things tend to "stick to it." Meaning if I were to shoot on green, then after I cut my subject out there is basically always going to be sort of a green haze left around the edges of the hair. Sure, there are ways of dealing with that - as far as I'm concerned Photoshop can do ANYTHING if you take enough time to do it, but why make life hard on myself? Which is why I pretty much only use black or white.
It's a simple formula, actually. If you are going to be compositing your subject onto a dark background, shoot on black. If you're going to be compositing them onto a lighter background, shoot on white. It's as easy as that. This way, if/when the hair does hold onto some of the lighter or darker pixels of the background, they will drop right over the somewhat matching background and blend in nicely. For the image in this post (from the tutorial I made ... did I mention the tutorial!?!?!), I knew she was going onto a lighter background, so I shot her on white. You'll see below what it looks like when placed on white, and then also what it looks like when placed on black. Note the weird white haze? Aka the reason you don't want to shoot on a white background if you're compositing your subject somewhere dark.
Actually, now that I think about it ... I'm a total liar ... If I knew for sure I was going to be compositing someone onto an intense color, like perhaps they will be placed in front of a funky purple wall or something, I would in that case try to shoot on a purple background. However, thus far in my compositing career I've pretty much always shot on black or white and found that I could always make that work. There have been times when I've shot on grey, but it definitely makes for a harder masking job because there is less contrast between most hair tones and grey.
One last extra little tip: if you're shooting a model with black hair, maybe try to composite them on a lighter background. From experience I can promise black hair cuts off of a white background like (insert clever comparison with something that easily comes off of something else here). Not to say that you CAN'T shoot dark hair on a dark background for a composite, it's just more difficult. Like I said, Photoshop can do anything if you put in enough time, but I do my best to give myself enough shortcuts so I can spend more time doing my favorite parts, like painting and coloring and such.
Hopefully that little tip was helpful and has left you wanting more. More that you will find convenienctly packaged in THIS EPIC COMPOSITING TUTORIAL. Okay thanks, love you byeeeee.
